The most commonly asked questions about the Bender Sequencer are: "I have/want to get a Bender Sequencer, so how do I hook it up to my ___?" and "What is the easiest device to hook up to the Bender Sequencer?" Well, here are the answers.
In this article, I will show how I use the Bender Sequencer to control the Gakken SX-150 and Korg Monotron mini synthesizers. I chose to discuss both the SX-150 and Monotron in the same article because they are popular, inexpensive, and very similar. As has been oft noted, the SX-150 is packaged with a magazine that includes a photo of Gakken showing the SX-150 to Korg engineers in 2008, two years before the Monotron was released. Coincidence? Not likely, but let's put aside conspiracy theories and get to work.
The main similarity between them is that they both use a ribbon controller to control the pitch. The SX-150 uses a stylus touched to a ribbon and the Monotron uses a pressure sensitive ribbon. Slightly different hardware, but exactly the same concept. In both cases the ribbon is simply a variable resistor. You could disconnect the ribbon and hook up a simple potentiometer (pot), and the synth would work exactly the same. That is a key point. After all, the Bender Sequencer is designed to connect to a device at the pitch resistor (variable or not). So, these two devices are perfect candidates for sequencing.
Sequencing the Gakken SX-150
We will start with the Gakken because the guts of its ribbon controller are exposed. Take a look at the photo below.

Rather than soldering wires directly to the Gakken, I soldered alligator clips to wires. The wires are connected to the screw terminals on the Bender Sequencer and the clips are connected to the Gakken's stylus and the high end of the ribbon. This makes a secure, but temporary connection. I use that method a lot when first testing a new device with the Bender Sequencer.
How It Works
It works because the Bender Sequencer presents a variable resistance at its output terminals. It is not a control voltage as you might find in a sequencer designed for a modular synthesizer. In fact, there is no voltage present at the output terminals. In effect, what the Bender Sequencer is doing is connecting the output terminals to each of its potentiometers, one at a time, in sequence. The Gakken's ribbon controller is a variable resistor. Instead of touching the stylus to the ribbon to set the resistance for the circuit, we have inserted the Bender Sequencer's variable resistors in its place.
That is how the Bender Sequencer works with any device. If there is no ribbon controller, then there will be a pitch potentiometer (a variable resistor) that you can connect to. Some circuit bent devices were not designed to have their pitch changed, but they have a fixed resistor on the circuit board to control the pitch. The Bender Sequencer can replace that fixed resistor with its sequentially changing variable resistors.
Installing a Pitch Resistor Jack
The alligator clips work great for testing, but for every day use or performance, I prefer a more solid connection. I like to install a pitch resistor jack in any device that I will use with the Bender Sequencer. In the picture below you can see how I installed a pitch resistor jack in the Gakken. There is a 3.5mm (1/8") jack installed in the side of the device. One terminal of the jack goes to the screw that holds the stylus wire. The other jack terminal is connected to the wire that goes to the high end of the ribbon. It is a breeze to install the jack, even for a relative beginner. The Gakken has plenty of empty space inside the enclosure, and the connection points are big and obvious.

I soldered two wires to a 3.5mm plug and connected the wires to the screw terminals on the Bender Sequencer. This setup lets me plug the Bender Sequencer into any device in which I have installed a pitch resistor jack, as shown below.

Sequencing the Korg Monotron
Modifying the Monotron for use with the Bender Sequencer is exactly the same process as modifying the Gakken — only much harder. It is harder for two reasons. First, the Monotron has no screw terminals or dangling wires for the ribbon controller. The ribbon is connected to the circuit board via a surface mount connector. So, the wires to the jack must be soldered very carefully to the surface of the board. That is something that is not easy for a beginner to do, but an experience circuit bender will have encountered surface mount pitch resistors many times and will have no problem with it. The second reason that the Monotron is harder to modify than the Gakken is that the Monotron enclosure is cramped. I mean really cramped. The photo below which shows the pitch resistor jack installed.


You can see what I mean by cramped. There is almost no space big enough for a jack. That little notch at the top next to the two built-in jacks is where I was going to put my jack. Then I realized that space is filled by the speaker, which is attached to the top half of the enclosure. Doh!
I finally settled on the only spot that I believe will work. The jack goes in the little space next to the ribbon controller. I started with the slimmest jack I could find. Then, I had to break part of it off to make it even slimmer and file down one side to make it conform to the rounded enclosure. It is a little rough, but when the enclosure is screwed together it looks just fine.
The end result is worth it! I now have a Monotron with a pitch resistor jack, so I can just plug in my Bender Sequencer and play.

Continuous versus Gated
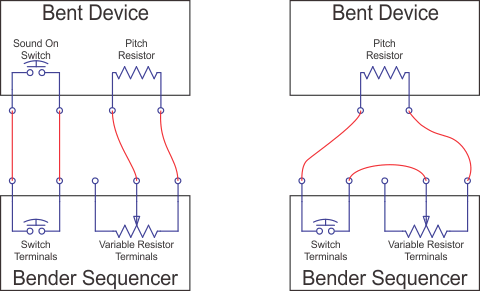
Both the Gakken and the Monotron have a built-in gate circuit. That is, they only play sound when the stylus or a finger is pressed on the ribbon. When we connect the Bender Sequencer, it completes the circuit made that is usually made by the stylus or finger, thereby activating the gate circuit. So, the sound is continuous and not individual notes. It is as if you pressed the stylus/finger on the ribbon and moved it up and down to different pitches. That sounds good, and it may be the sound that you are after. However if you would like to simulate the pressing and releasing of the stylus/finger, then we can do that too.
In addition to the variable resistance terminals, the Bender Sequencer also has switch terminals. The switch terminals act like a momentary pushbutton switch that is pressed once for each step in the sequence. Some devices have a physical button that you can connect to the switch terminals. However, as described above, the Gakken and Monotron do not. So, what we do in this case is put the Bender Sequencer's switch output in series with its variable resistor output. If you look closely at the above pictures of the Bender Sequencer connected to the Gakken and Monotron, you will see a small white wire that goes from the center resistor terminal to one of the switch terminals. The plug is connected to the right resistor terminal and the other switch terminal.
In schematic diagram format, it looks like this:
Below is a video of the sequencer controlling the Gakken SX-150, Korg Monotron and eight other devices.
So, there you have it. Go forth, bend, and sequence!